How to test your RV for a proper chassis ground bond
Dear Mike,
You talk a lot about RV grounding and bonding, and I understand that the frame of the RV is supposed to be connected to the green ground wire. But exactly how is the ground wire connected to the RV frame and is there a definitive test for this? —Eddie
Dear Eddie,
Yes, you are correct that the green ground wire of the shore power plug is supposed to be connected to the RV frame. Technically, this ground wire is named the EGC (Equipment Grounding Conductor) and connecting wiring together is called “bonding.” So what you’re doing is “bonding” the “EGC” to the frame. And on the surface, it seems simple. You just connect the incoming green wire to the frame using a bolt through the metal. However, the reality is that there’s a more complex situation.
Just how do you test the wire bond to make sure it’s a solid connection? Any corrosion or loose connection at the EGC bonding point will defeat the safety connection. Even paint on the frame that wasn’t removed properly around the bonding point will interfere with the low-resistance connection that’s needed for a proper safety ground.
Better Testing
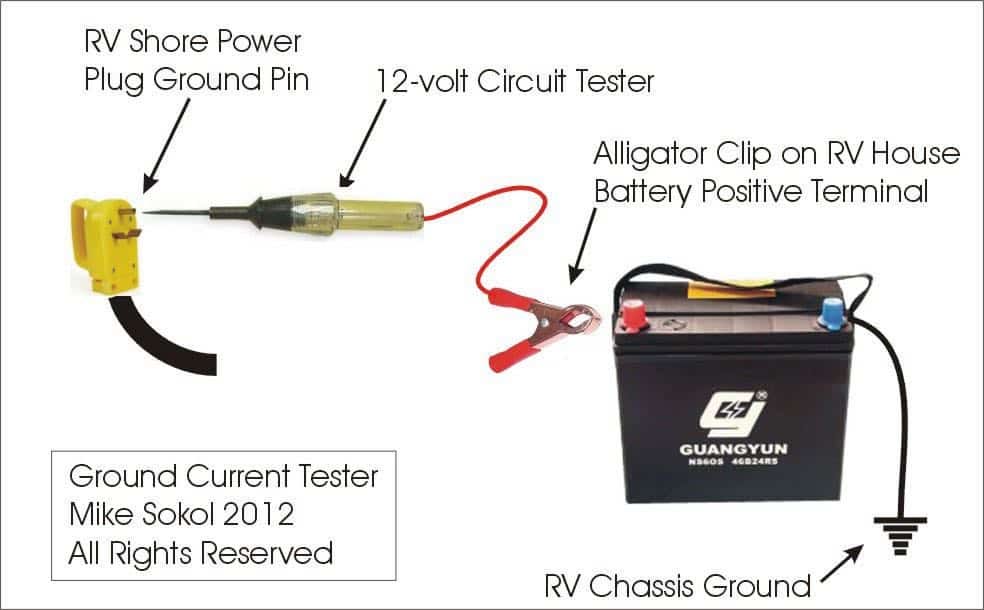
So is there a definitive way to test for this connection, as important as it is? Sadly, there’s nothing commercially available to do your own test, and as far as I can see there’s no automated process in use by any RV manufacturer that I’ve discussed this with. However, I’ve designed a simple tester you can build and use yourself for checking your RV EGC bond to the frame. See the diagram below.
This is based on an old test I used to do on 12-volt battery systems in cars, and with a little tweaking it works great for testing an RV for a proper ground-bond. The key part of the test is a basic 12-volt circuit tester you can get in any auto parts store for $10 or so. Make sure you get an old-school incandescent version that will draw a few watts at least. We’ll be using it backwards for this test, so please follow along carefully.
Instead of connecting the test light’s alligator clip to the frame of the RV, you’ll be connecting it to the 12-volt positive terminal of the house battery. When you touch the point of the tester to the frame the light should come on brightly. Once you’ve got that far, then you’re ready for the actual test.
Let’s Begin…
With the shore power plug disconnected from power and any generators turned off, you can now place the tip of the tester on the ground pin of the shore power plug. Since this wire is supposed to be connected to the RV frame, the light should come on brightly again. While you’re connected to the ground pin and watching the light, go ahead and shake the shore power wire and make sure the light stays bright and doesn’t blink. If it does blink or flicker that’s a sure sign there’s a break in the wiring somewhere.
Step 2
Next, add on whatever dog-bone adapter you may use, and test for a solid light (good continuity) at that connector. The light should stay bright and not flicker or dim even when you twist and flex the wires. Finally, add on whatever extension cords you may use and connect the tester to the ground pin at the end of the line. The test light should stay bright and not blink. If there’s any dimming or blinking at all, that’s a signal of a break or corrosion somewhere in the wiring.
A more advanced test
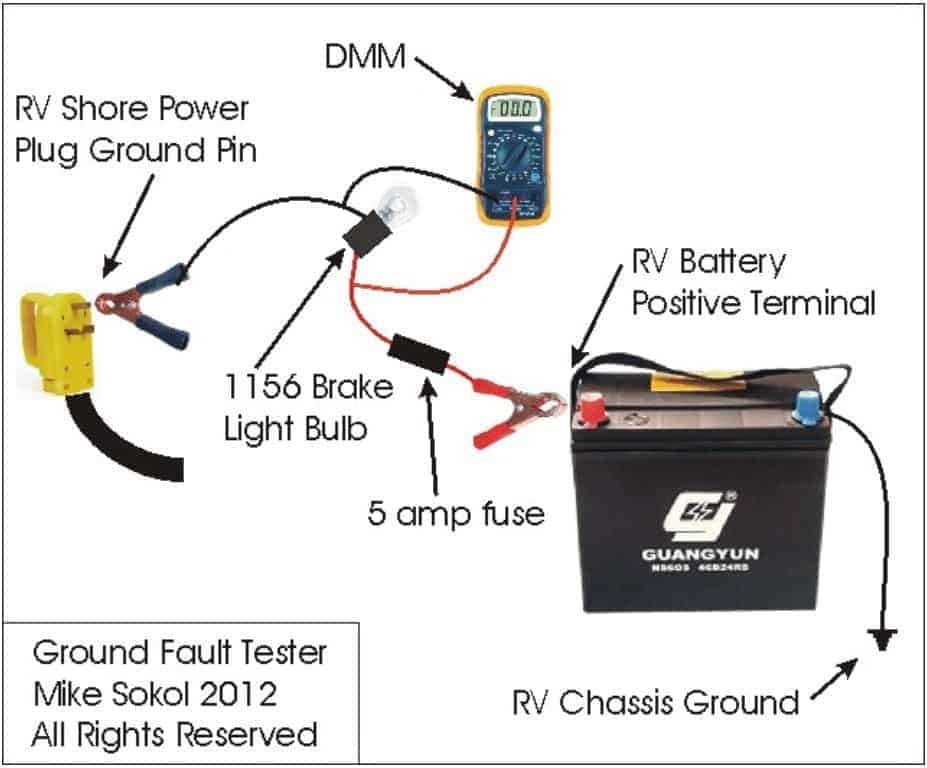
Because I like accuracy, here’s a sneak peek at my advanced test which can measure down to a fraction of an ohm.
These tests are far superior to just using an ohmmeter since it drives an ampere or so of current through the ground-bond connection, which is what the EGC needs to actually do. And because it’s only 12-volts DC, it’s a perfectly safe test for you to perform. But please take all safety precautions and use safety glasses and don’t leave the light running unattended. That’s because the bulb can get hot and possibly melt anything it contacts.
Using a 4-wire Kelvin Bridge
This ain’t cheap, but here’s my 4-wire Kelvin bridge that costs $600 but is accurate down to 0.01 ohms.
The 4-wire bridge meter automatically nulls out the length of the test leads. I’ve added 150 ft of extensions to the test leads and still measured down to 1/100th of an ohm. More in that later….
These are troubleshooting tests
You don’t need to do this level testing all the time, but if you’ve felt a hot-skin shock and you’re worried about the continuity of your RV’s EGC ground, this test procedure can save you hours or even days of troubleshooting. I’ve been called into RV dealership/shops to find the cause of a hot-skin shock that eluded RV technicians for weeks. A solid Chassis to EGC Ground is the most important connection in your RV.
Let’s play safe out there…. Mike


Thanks for the article. I would love to see you do a test or remind us on how to properly test for a "ripple" in the DC line that can cause issues with refrigerator circuit boards and other electronics. I had one and accidentally replaced the fridge thinking it was bad.
Can the positive on the battery remain connected to the rv during the test?