Testing for a blown fuse with a multimeter
Fuse testing is pretty simple once you learn the basics of how to use a meter....
Using a digital multimeter to test a fuse
Q: Hi Mike. Please forgive me for being a newbie. I went to my local auto store and looked at digital voltmeters. I found one for $20 but the max fuse amperage is 10 amp only and my RV has up to 20 amp fuses. I asked the employees but nobody could give me a straight answer. Someone told me to go to Lowe’s and get one with a higher amperage capacity. But before I spend more money, do I need a meter with a higher amp capacity or should the $20 10-amp max meter work? Please advise me what to get for what I need to do. Thanks a lot for your help and advice. I really appreciate it very much. —Robert
A: Hey Robert. There’s a lot of confusion in your question mainly because the guys at the auto parts store have no training on how digital meters work. That’s a shame, especially since it’s something I could teach if AutoZone or Advanced Auto Parts or anyone else would come up with a budget for me to create a class for them. But more on that later.
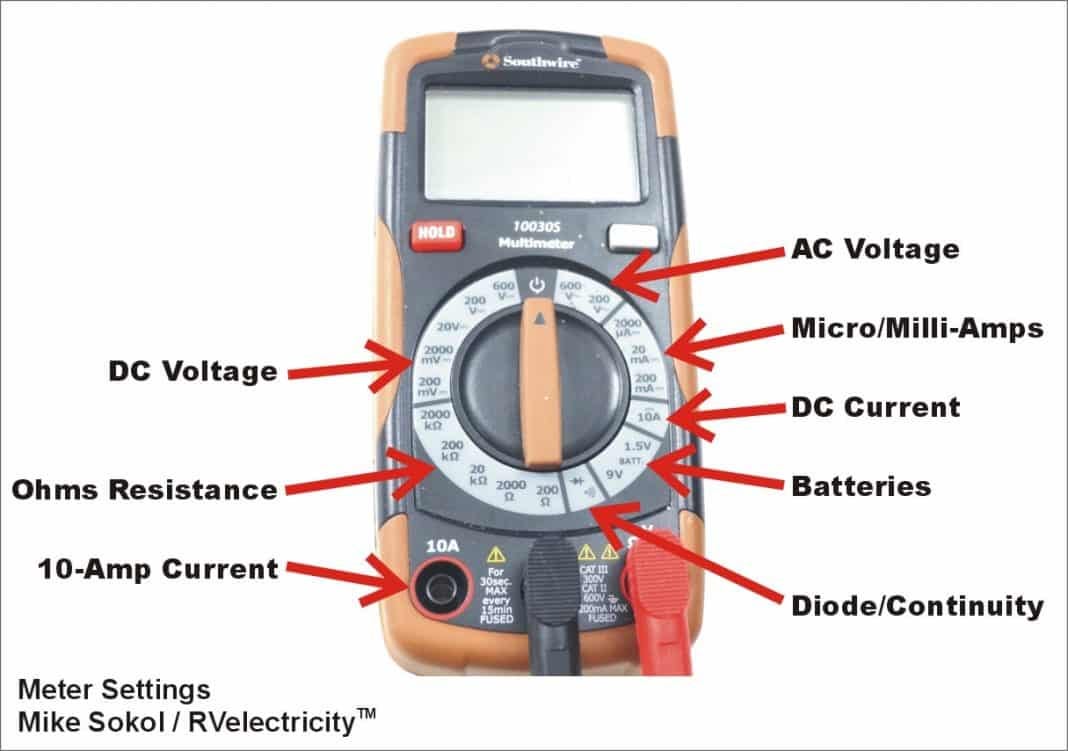
Here’s your answer, which is going to take an extended article and a bunch more pictures to show you the details. But the main point is the 10-amp scale on a digital meter has NOTHING to do with how big of a fuse it can measure. In fact, you don’t use the ampere scale at all when testing fuses. There’s a diagram below I just made showing the basic functions of a manual ranging meter from Southwire which only costs around $20 from Lowe’s, and which is my favorite low-cost meter for working on RVs.
To read why the amperage settings aren’t used for fuse testing, and to see how to do this correctly, read the rest of the article below. But any meter you buy that has a resistance or continuity setting (and they all do) will do the trick.
Meter basics – It’s all Greek to me…
You’ll see on the meter picture there’s a bunch of different settings with foreign-looking words. Don’t worry, this is actually English for Engineers. I’ll help translate.
Let’s start at the top right of the meter
The AC voltage settings are for exactly that – testing AC voltage. Note that there are 200 and 600 settings, each of which represents the maximum voltage the meter can read before the display shows OL, for Over-Limit. For most AC testing in an RV you’ll want to use the 600-volt setting.
Next down on the settings you’ll see what’s called micro-amp and milli-amp settings. Don’t worry about those settings at this time, since you’ll probably never use them except for advanced testing. We’ll skip those for now.
Don’t use the 10A jack or 10 Amp setting for now…
Same for the setting that says 10A for the 10-ampere current testing when the test lead is plugged into the special 10A socket on the lower left of the meter. You may use this for advanced current testing, but not right now so we’ll skip it.
Down on the lower right of the dial you’ll see something that says Battery 1.5V and 9V. This setting is for providing the proper load to test 1.5-volt and 9-volt batteries. It should be obvious what this setting is for, but more on that later.
On the lower left of the dial you’ll see settings for 200 ohms, 2000 ohms, 20k ohms (which is 20,000 ohms), 200k ohms, and 2000k ohms (which is 2 million ohms). The only one we’ll worry about for basic RV continuity testing is the 200-ohm setting. Ignore the rest for now.
On the upper left part of the dial you’ll see the DC voltage settings for 200mV (200 milli-volts or 0.200 volts), 2000mV, 20 volts, 200 volts and 600 volts. We’ll likely use the 20-volt setting someday for reading the charge on 12-volt batteries, but not right now.
Let the testing begin…
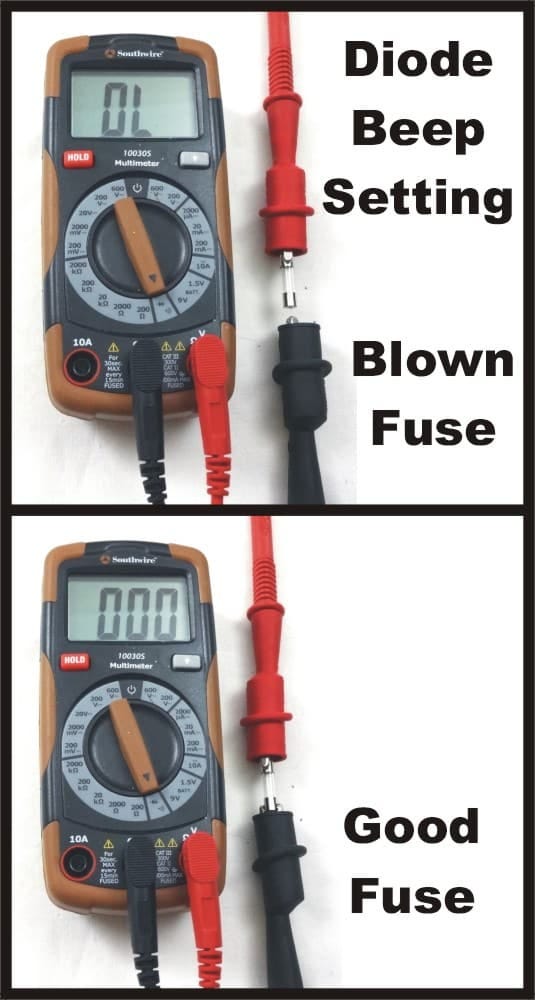
Here’s how to test any fuse for being open (blown) or continuity (good). All good fuses should measure very close to a dead short resistance (around 1 ohm or less). All blown fuses should measure very close to infinity (many millions of ohms), which will show up on this particular meter with an OL reading on the face for Over-Limit.
Set the meter to the Diode/Beep setting and place the test leads on both sides of the fuse which has been removed from the circuit. NEVER test a fuse in the circuit especially if power is applied since you can blow the meter.
I’m showing a little cartridge fuse in the picture, but this works for any fuse. And because the resistance you’re looking for is so low, you can touch the fuse contacts with your fingers and it won’t affect your readings, nor can it shock you. If the beeper sounds, and the reading on the meter face is around 1 ohm, then all is well with the fuse. Note that this same setting works for 1-amp, 10-amp, 100-amp or even 1,000-amp fuses. The 10-amp setting on the meter has nothing to do with resistance testing of fuses.
Let’s use the resistance (ohms) setting
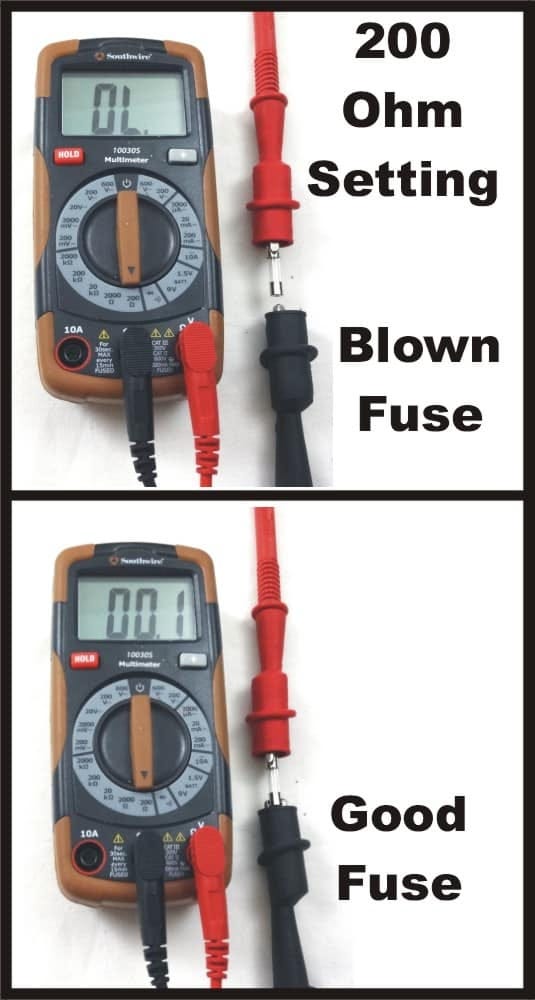
You can also use the 200-ohm setting on the meter if you like, or if your own meter doesn’t have a continuity/beep setting.
In this case the same basic rules apply. If the meter reads less than 1 ohm or so, then the fuse has continuity and is good. But if the meter reads OL, for Over-Limit, then the fuse has infinite resistance and is blown. Again, never test a fuse using the resistance or continuity settings while the fuse is in the circuit, especially if power is applied. You’ll either get confusing meter readings, or you might just blow up your meter.
Digital voltmeters are great tools, but only if you understand how to use them. And always be extra careful when measuring 120- or 240-volt circuits. Yes, that voltage is really going into your meter, and if you make a mistake like putting the test leads on the energized circuit first, and then turn the selector knob to the desired setting, you’ll probably spin though the milli-amp or resistance settings on the way there. A good meter will just blow the fuse, but a cheap meter may just die. So don’t go there.
Get your own meter…
By the way, Southwire sells a manual digital multimeter as part of an inexpensive package that also includes a basic 3-light outlet checker and a Non-Contact Voltage Tester for around $30. It’s a great troubleshooting and test kit that everyone should have for their RV adventures. You can find it in your local Lowe’s store or online.
Let’s play safe out there… Mike


Are you going to do more articles about using a multimeter, or have you already done them? It would be helpful.
Thank you. This was very informative and helpful. Nowitstime to purchase a multimeter!