Here’s the followup of my JAM session last week with the basic operation of a digital meter for measuring AC voltage.
CAUTION: Miswired outlets are possible with any of a number combination of wiring problems. If your outlet doesn’t measure exactly as I show below, then get a qualified technician or electrician to correct the problem before you plug your RV into it.
The Meter
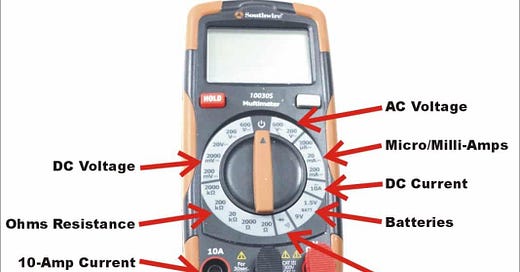
Now is the time to familiarize yourself with your Digital Multi-Meter (DMM). Here’s a pretty typical $20 meter that you can purchase at Lowe’s, Home Depot or Amazon. You’ll notice a bunch of strange markings on the selection knob, only a few of which will work to measure AC voltage. Don’t be tempted to just plug the meter leads into a campsite socket and spin the knob. That will guarantee a burned out meter (at the least).
Note the markings on the control knob are divided into four major groups.
AC V (AC voltage)
DC A (DC amperage)
OHM (electrical resistance)
DC V (DC voltage)
The only group you’ll be interested in today is the AC V section for measuring the 120- or 240-volts AC in a campsite pedestal.
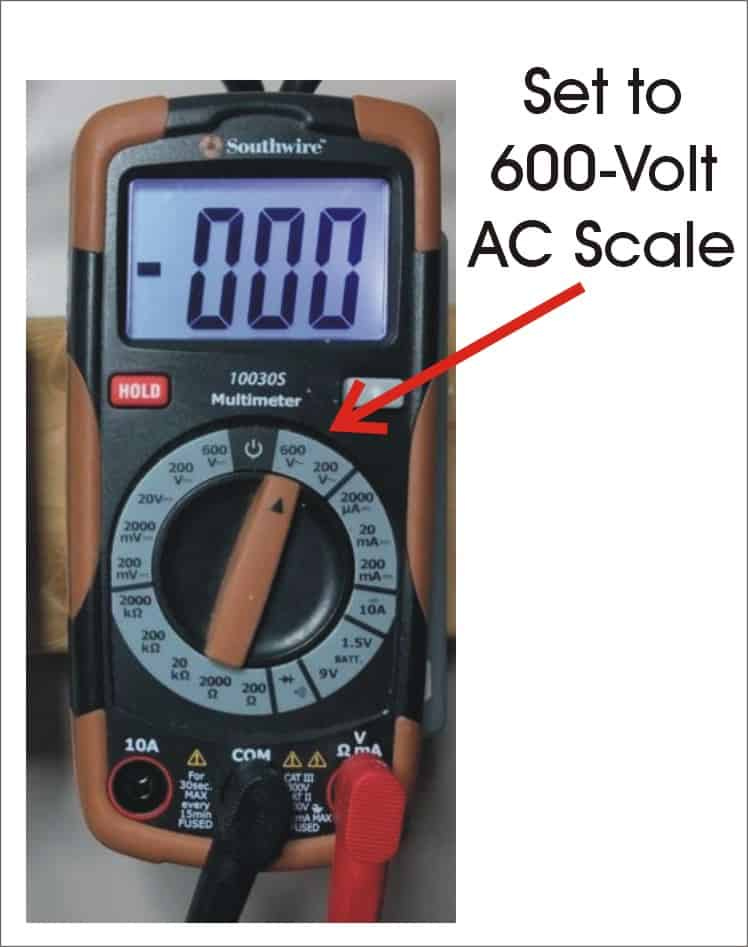
Also take a look at where the meter leads (or “probes”) are plugged into the lower right-hand connections on the meter itself. The Black COM (common) input is always connected to your black meter probe, and the red V-Ohm-mA (milliamperes) input is always connected to your red meter probe. Never put either meter probe into the 10A socket, which is designed specifically to check current flow up to 10 amps.
All meters read the difference between the two lead connections, so if the black probe is touching 0 volts and the red probe is touching 120 volts, the meter will read 120 volts. The key to using a meter correctly is to connect the meter probes between the two voltages you want to measure.
Now, let’s move back to the meter settings. In the AC V area you’ll see a 200 and a 600 setting. When set to 200 the meter will read up to 200 volts; when set to 600 the meter will read up to 600 volts. Since we could be reading as much as 240 volts, we’ll always set this to 600 V in the AC section and leave it alone during all testing.
The Outlet/Receptacle
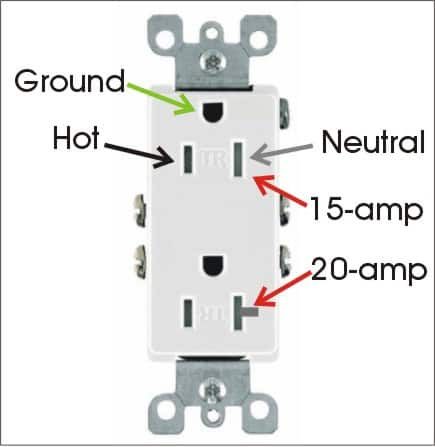
Before you graduate to measuring the big 240-volt, 50-amp outlets, you need to start on a common 120-volt, 20-amp outlet like you might find in your living room or throughout your RV. Here’s what one looks like and the connections as standardized by the National Electrical Code. You’ll see a little U-shaped hole, which is the Ground; a taller slot on the right, which is the Neutral; and a shorter slot on the left, which is the Hot connection.
Don’t be confused if the receptacle is mounted with the ground connection to the bottom. In campgrounds, the ground is always supposed to be at the top so the shore power cord will hang down correctly. If the outlet is wired correctly, the taller slot (which will have a sideways T contact for a 20 amp outlet) is supposed to be wired as the NEUTRAL, and the shorter slot is supposed to be wired as the HOT (if properly installed). Also note that the only difference between a 15-amp and 20-amp outlet is the sideways T-shaped neutral contact on the 20-amp version. But even if your outlet looks like it’s a 15-amp version, it will still carry 20 amps of current if connected to a 20-amp circuit breaker and 12 gauge wiring.
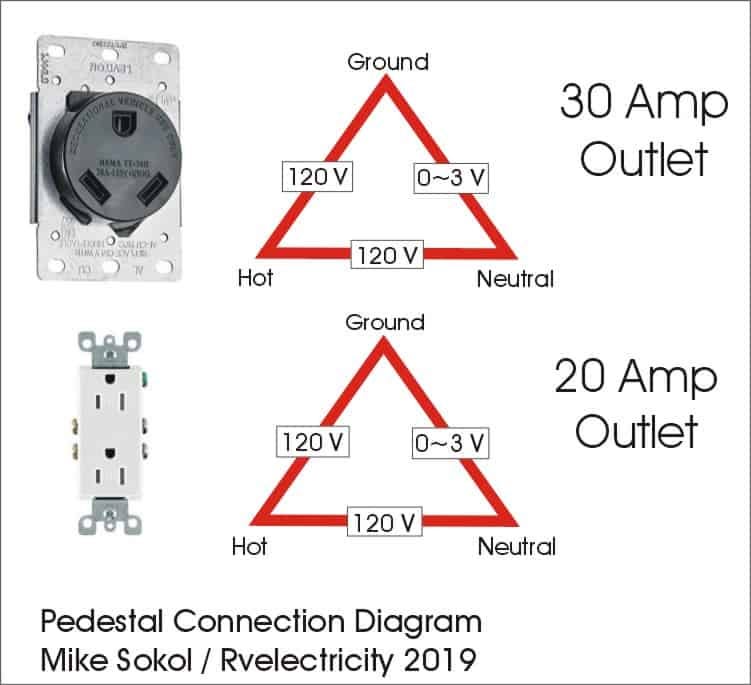
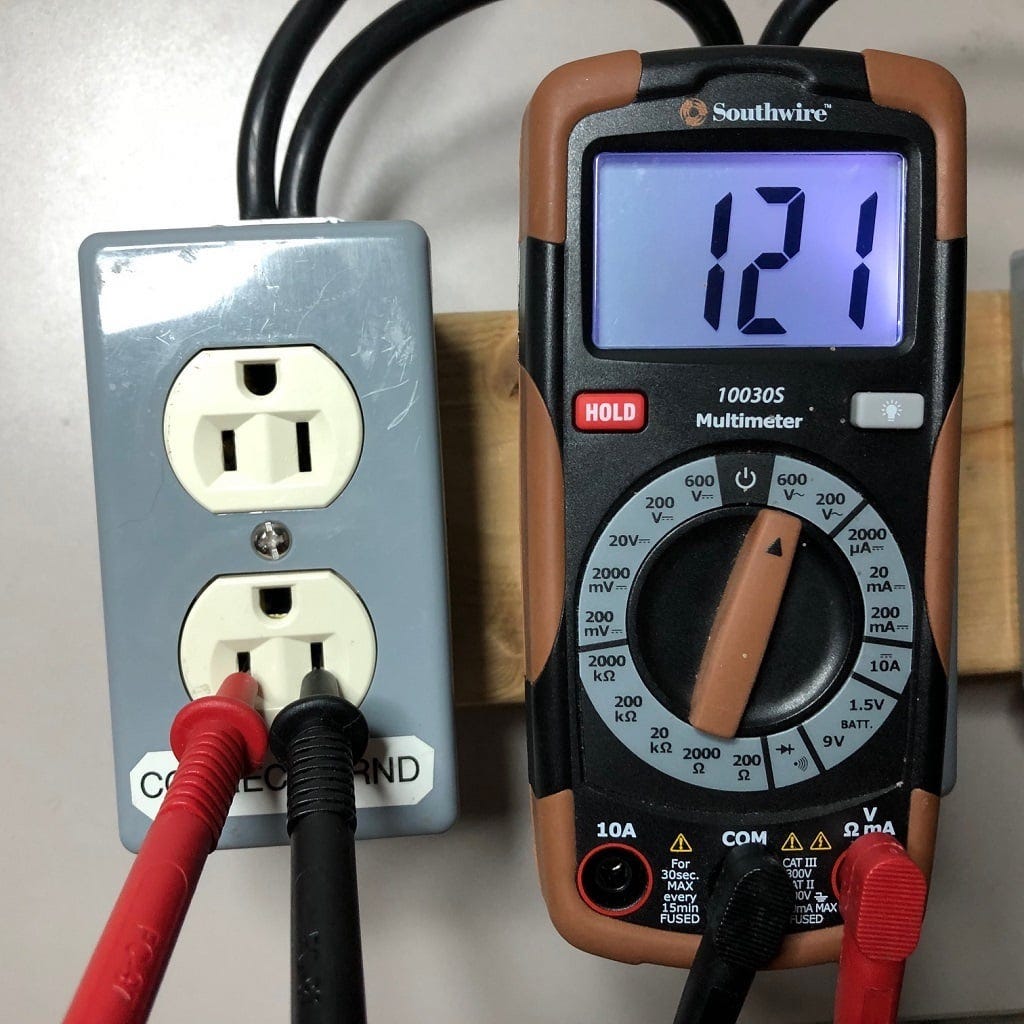
Here’s what you should measure from a properly wired 15- or 20-amp outlet at a campsite or home. And you should measure exactly the same voltages from a 30-amp pedestal outlet as well.
The Measurements
Since we’re going to be measuring live voltage, you need to observe these safety rules:
Use only one hand to hold the plastic handles of the meter probes
Be sure you don’t touch the metal tip portion of either probe
Don’t stand or kneel on wet ground when measuring live outlets
Hot to Neutral
With nothing plugged in to the camp outlet, switch on the 20-amp circuit breaker at the power pedestal, set your meter to the 600 or 750 V AC setting and using one hand, insert your meter probes into the left and right Neutral and Hot slots of the outlet. Remember not to rest your opposite hand on the metal box. It really doesn’t matter which side of the outlet gets the red or black meter probe since you’re reading Alternating Current.
Since the Neutral connection should be near 0 Volts and the Hot connection should be around 120 volts, your meter should read somewhere between 108 and 128 volts on the digital display. If not, then something’s wrong with the power hookup. If you measure 0 volts, then maybe you need to reset the circuit breaker, or if you have an outlet with a GFCI (Ground Fault Circuit Interrupt) remember to push the little reset button on the outlet itself. If it still doesn’t measure 108 to 128 volts, immediately contact the camp manager.
If you measure 220–250 volts, then that power outlet has been jury-rigged inside the box to produce higher voltage. This is illegal and highly dangerous as you’ll surely blow up every piece of electrical gear in your RV if you plug into this outlet. So, if you read 240 volts on the 20- or 30-amp, 120-volt outlet, do not plug in your RV, and, again, immediately contact the camp manager.
Hot to Ground
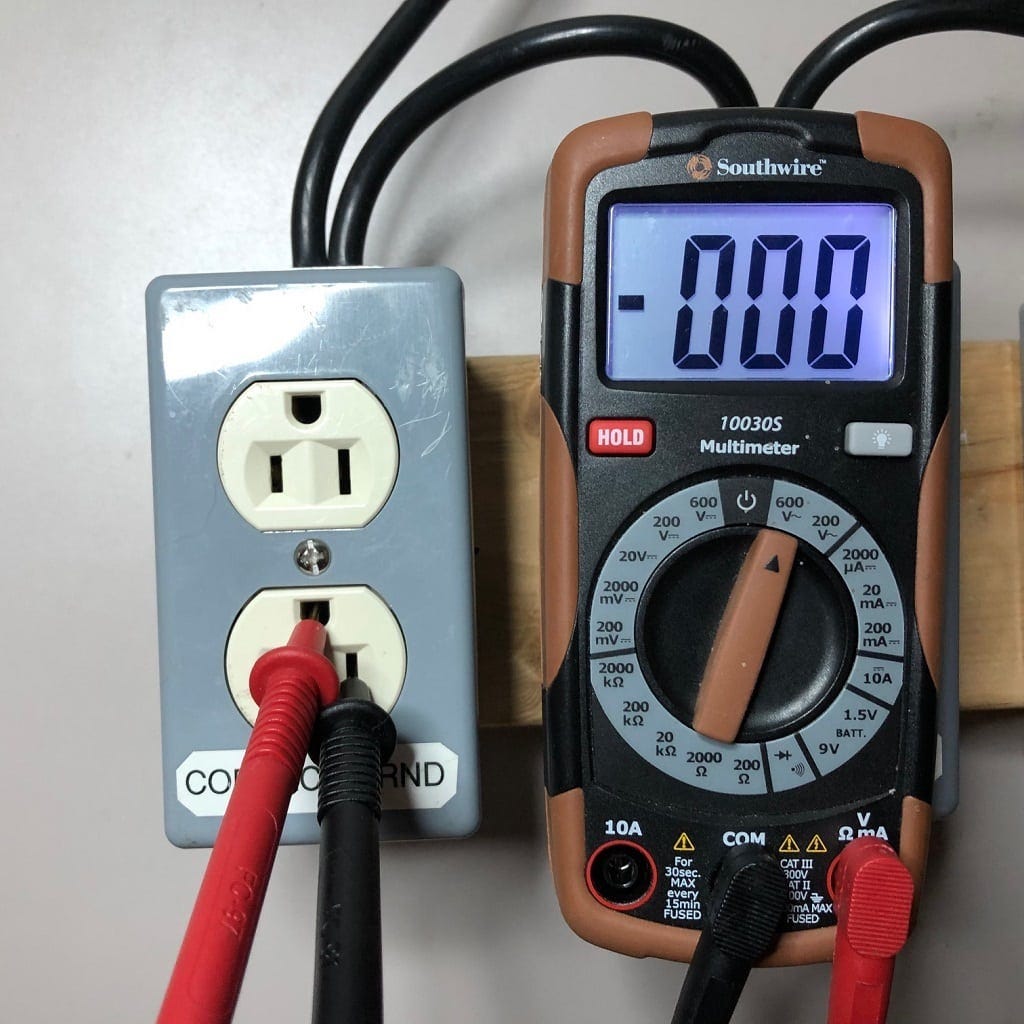
If the hot-to-neutral checks out around 120 volts, then it’s time to test the ground, so plug your two meter probes into the HOT (shorter slot) and GROUND (U-shaped hole) connections. If you read 0 or something strange such as 60 volts, then the ground wire might be floating (disconnected), which could cause a hot-skin condition that will shock you when touching the body of the RV. Again, do not plug your RV into this outlet as it could be dangerous.
Neutral to Ground
Next, check from Neutral to Ground. That should read very close to 0 volts, but up to 3 volts on a loaded circuit is acceptable according to the electrical code (due to normal voltage drop on the neutral conductor). If, however, you read 120 volts from Neutral to Ground, then the polarity of the power outlet is reversed. Don’t plug your RV into this outlet.
Final exam
If you’re only using 20-amp power for your RV, you’re just about done. At this time I recommend plugging a standard 3-light outlet tester into an outlet inside your RV that you can see from the open door or window. Now, go ahead and switch off the circuit breaker, plug in your 20-amp RV connector, and turn the circuit breaker back on. But before you touch anything on your RV take a peek through the door or window at the outlet tester inside your RV to confirm it’s showing the same Yellow/Yellow pattern. If not, then your extension cord or RV plug has been incorrectly wired. If that’s the case, turn off the circuit breaker and find out what’s wrong before proceeding to power up your RV.
Once you’re familiar with the procedures, all this can be done in a minute or two. It’s a very small inconvenience that will help ensure the safety of you, your family, friends and pets. Stay safe!
Quick Tips
Always set your meter to read AC volts using the 400-, 600- or 750-volt scale.
Hot (short slot) to Neutral (tall slot) should read approx. 108 to 128 volts.
Hot (short slot) to Ground (U-shape) should read approx. 108 to 128 volts.
Ground (U-shape) to Neutral (tall slot) should read approx. 0 to 3 volts.
Coming Soon: 50-amp outlet measurements!
Next week we’ll take a deep dive in how to measure 50-amp shore power outlets. Split-phase 120/240-volt power can be a bit confusing, but I’ll take it step-by-step.
OK, everyone. Remember that electricity is a useful and powerful force, so we all need to pay attention to safety precautions while using it.
Let’s play safe out there…. Mike

